
How to make chicken biryani in pressure cooker. Recipe for pressure cooker chicken biryani made with the addition of coconut milk. Recipe with step by step pictures and video.
This is the Sunday Biryani my mom used to make for us. Its very simple to make and one of the easiest Biryani recipes. The different thing about this Biryani is the addition of coconut milk. It gives a nice richness and flavor to the Biryani. Green chillies is the only spice used and there is no spice powders used in this recipe. The flavour is so unique. This biryani always brings me so many memories and is one of my favorites.
Here is the video of how to do Pressure Cooker Chicken Biryani
Here is how to do Pressure Cooker Chicken Biryani
For other varieties of Biryani, Click Here
Rice
I like to use the following brands for making biryani as the rice does not break while cooking and stays fluffy.
Gently wash the basmati rice in running water and let the rice soak in the water. Soaking the rice in water is one of the key steps in making biryani in pressure cooker. It helps in keeping the rice intact while cooking without becoming mushy. Soak the rice in water before starting to cook. Let the rice soak for 20 minutes. Drain the rice and set aside.
We will need the following two pastes for the biryani.
First Paste: Grind ginger, garlic and shallots to a smooth paste adding little water. (add upto 1/4 cup of water)
Second Paste: Grind Cinnamon, Cardamom, Cloves, Fennel Seeds and Green Chillies to a smooth paste adding little water. If you want a spicy biryani, you can add one or two green chillies more. Adjust the spice levels according to your taste. (add upto 1/4 cup of water)

Heat oil in a pan (and ghee if using) and add in the sliced onions and green chillies. Fry well till the onions are soft. Add in the first paste and fry for a couple of minutes. Note: The ghee is optional as the coconut milk is also rich. I add it if I make it for a party or for friends. If making at home, you can omit the ghee.
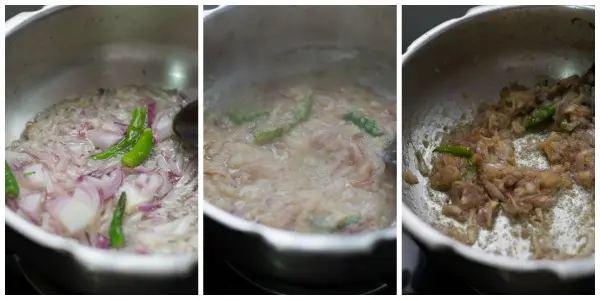
Add in the second paste and fry till the mixture is dry and streaks of oil appear on top.
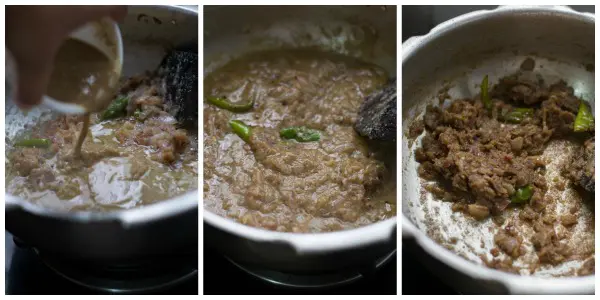
Add in the chopped tomatoes, chopped coriander leaves and chopped mint leaves. Fry for a couple of minutes. Add in the cleaned chicken pieces and the salt. Let the chicken cook on low flame for 12-15 minutes. Keep sauteing every two minutes once to avoid the chicken from burning at the bottom. Don’t add any water. The water from the chicken will be enough to cook.

Add in the coconut milk and water. The ratio of liquid to rice is one rice : 1.5 liquid. Add a combination of coconut milk (first and second pressed) and water. Add in the lemon juice. Let the liquid come to a boil. Once the liquid is boiling, drain the rice and add it to the pan. Here is how to do coconut milk.
Note: If you are in a hurry, you can use canned coconut milk and it works equally well too! If using canned coconut milk, use 200 – 250 ml canned milk for this recipe.

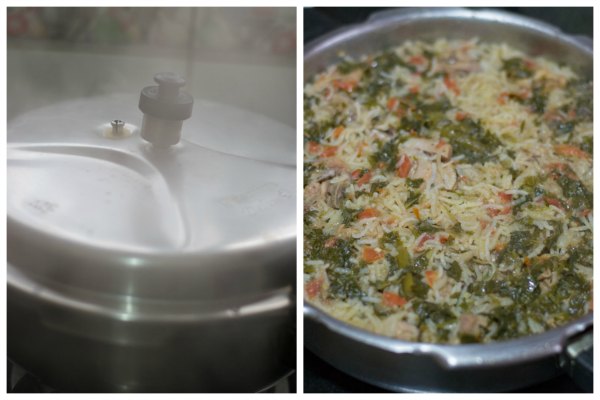
Close the pan and cook on medium flame for first whistle and on low flame for the next whistle (about 3-4 minutes). After the two whistles, switch off the flame and wait for pressure in the cooker to release naturally. Open the pan and fluff up the rice gently. Serve Pressure Cooker Chicken Biryani hot.

Amma’s Coimbatore Style Easy Pressure Cooker Chicken Biryani
Recipe for easy Chicken Biryani made in the pressure cooker. Pressure cooker chicken biryani recipe with step by step pictures and video.
- Total Time: 55 mins
- Yield: 4 servings 1x
Ingredients
First Paste
- 10 cloves garlic
- 10 shallots (small onions)
- 2 inch piece ginger
Second Paste
- 3 green chillies
- 2 teaspoon fennel seeds
- 2 inch piece cinnamon
- 2 cardamom
- 2 clove
Other Ingredients
- 2 tablespoon vegetable oil
- 3 tablespoon ghee (optional) – (add along with oil)
- 1 cup onions, sliced
- 3 green chillies
- 3/4 cup tomatoes, chopped
- 6 sprigs coriander leaves, chopped
- 8 sprigs mint leaves, chopped
- 500 grams chicken
- 2 teaspoon salt
- Juice of one lime
- 2 cups Basmati Rice
- 2 cups Coconut Milk (first and second pressed)
- 1 cup water
Instructions
Gently wash the basmati rice in running water and let the rice soak in the water. Soaking the rice in water is one of the key steps in making biryani in pressure cooker. It helps in keeping the rice intact while cooking without becoming mushy. Soak the rice in water before starting to cook. Let the rice soak for 20 minutes. Drain the rice and set aside.
We will need the following two pastes for the biryani.
First Paste: Grind ginger, garlic and shallots to a smooth paste adding 1/4 cup of water.
Second Paste: Grind Cinnamon, Cardamom, Cloves, Fennel Seeds and Green Chillies to a smooth paste adding 1/4 cup of water. If you want a spicy biryani, you can add one or two green chillies more. Adjust the spice levels according to your taste.
Heat oil in a pan (and ghee if using) and add in the sliced onions and green chillies. Fry well till the onions are soft. Add in the first paste and fry for a couple of minutes. Note: The ghee is optional as the coconut milk is also rich. I add it if I make it for a party or for friends. If making at home, you can omit the ghee.
Add in the second paste and fry till the mixture is dry and streaks of oil appear on top.
Add in the chopped tomatoes, chopped coriander leaves and chopped mint leaves. Fry for a couple of minutes. Add in the cleaned chicken pieces and the salt. Let the chicken cook on low flame for 12-15 minutes. Keep sauteing every two minutes once to avoid the chicken from burning at the bottom. Don’t add any water. The water from the chicken will be enough to cook.
Add in the coconut milk and water. The ratio of liquid to rice is one rice : 1.5 liquid. Add a combination of coconut milk (first and second pressed) and water. Add in the lemon juice. Let the liquid come to a boil. Once the liquid is boiling, drain the rice and add it to the pan. Here is how to do coconut milk.
Close the pan and cook on medium flame for first whistle and on low flame for the next whistle (about 3-4 minutes). After the two whistles, switch off the flame and wait for pressure in the cooker to release naturally. Open the pan and fluff up the rice gently. Serve Pressure Cooker Chicken Biryani hot.
Notes
Add a combination of coconut milk (first and second pressed) and water for making this biryani. If you are in a hurry, you can use canned coconut milk and it works equally well too! If using canned coconut milk, use 200 – 250 ml canned milk for this recipe.
- Prep Time: 15 mins
- Cook Time: 40 mins
- Category: Main Course
- Cuisine: South Indian, Tamilnadu

Instead of shallots onion, how much big onions diced can I use?
second one to try and got another success…Thank you..
will keep hitting one by one…..
thank you!
Hi suguna mam… Recipe came out excellently mam… Actually I’m a vegetarian but I would try ur non veg recipes without any doubt mam… My husband loved this biryani mam… The credit goes to you only for a yummy recipe mam.. thank you mam😊
Thank you so much 🙂 Means a lot.
This came out very well. I used instant pot at the end mixing all ingredients with rice.
Thank you for the recipe..
Thank you!
Hello suguna garu , so u mentioned 2 cups of rice , can you tell me how much each cup of rice in ml ?.
240 ml = 1 cup
Hey, can we eliminate the coconut milk?
Thats not a great idea.
I have done Soo many mutton briyani recipes using kannama cooks website.they all turned out good…this is the first time I’m cooking chicken briyani that too with basmathi rice and it turned out to be fab and becomes everyone’s fav chicken briyani…LYSM mam!
Thank You!
This recipe is gold when you’re looking for a quick fix biryani! Turns out the same every time if you stick to it. I personally add a few extra green chillies
Thank you!
Hi,
Any ideas on how to adapt this recipe to cooking in an instant pot instead of a regular pressure cooker
Very tasty and flavorful
Thank you!
Why there is no mention about turmeric, coriander and chilly powder. Is it not required?
Not for this recipe.
Superb…..
Thank you!
Loved it..thanks for sharing 😙
Thank you!
Very tasty and flavourful. I used organic basmati rice. It seemed to cook unevenly. I used 5 glasses liquid for 3 cups of rice. Any suggestions?
always soak the rice
Thank you for a great recipe! 6 chillies in total was perfect in terms of spice with the coconut milk.
Thank you very much!
wojderfull article love to read this <3
Thank you!
Hi akka
I am not good in making briyani’s ,but after I tried your Briyani recepie, got lot of confidence in me … it’s so simple and flavour full😍😋😋 … it is good if you are mentioning in grams for measurement of rice instead of cups, in all recepies .
When u say one cup , whether it is 160 ml or 240 ml cup for measuring rice?
Hi Lavanya,
Thank you.
1 cup is 240 ml
1 tablespoon 15ml
and 1 teaspoon is 5ml
Thank you.
Hi..I wanted to know if I can make this biryani with 2 cups rice in a 5ltr cooker and of yes..how much chicken should I use
Sure you can halve the recipe or double the recipe (just increase everything proportionately).
I tried this recipe and the taste was really amazing. Thank you Kannamma
Thank you!
Hi..
I tried to make this and the biriyani turned out well. Only drawback was the chicken pieces became very dry.can we please suggest what went wrong
you can marinate the chicken next time.
Thanks for ur reply mam…. Mam I made 750gms of rice nd 700gms of chicken in 7.5 litres cooker mam….
The cooker is too big for the quantity Vidya. Please use a small cooker.
If you do not have a small cooker, use the stove top pan method.
You can find the details of how to cook biryani on stove top without a cooker here.
https://www.kannammacooks.com/thalapakatti-style-mutton-biryani-recipe/
Hello! I tried this recipe with 3 cups of rice and roughly 750g chicken and it was way too much for my 5l cooker. I had to set aside almost an entire cup of rice to be cooked separately as it just wouldn’t fit in this size. Can you please advise what size cooker you are using in the original recipe?
I use a 5 liter pressure pan for 2 cups rice and 500gms chicken (as per the recipe) and the cooker fills to the top.
Do not do more than 2 cups in a 5 liter cooker.
Hi mam, prepared this for dinner and it turned delicious mam.. I have a small dbt mam eventhough I added 1cup of rice to2 cups of water it got burnt at the bottom… What could be the reason mam…..🤔🤔
What is the size of the cooker? For 1 cup rice, dont use more than 3-4 liter cooker. Else it will burn.
Dear Suguna mam, Likes to call you as kanamma only, my daughter(9 years old)loves my food so much and her friends too and she also knows that the secret recipe is from kannama. so now a days she too starts referring yours and gives advice to her grandma. Love you.
haha. Thank you so much.
This dish came out very nice easy to make also. Felt kovai flavor thanks a lot of sharing wonderful recipes with us
Thank you so much.
Hi mam..How many grams would 1.5 cup be approximately
This biryani is awesome. I make it again and again and will do so for Christmas.
Thank you so much. Merry Christmas to your family.
Hi Kannamma,
I can only get canned coconut milk or canned coconut cream, not fresh coconut. Can I used one of the canned varieties for this recipe? Also, do we serve this with raita?
Thanks.
You can use canned coconut milk. No problem. If using canned coconut milk, dilute with equal qty of water and use it in the recipe. If the recipe asks for 1 cup of coconut milk, then add 1/2 cup canned coconut milk and 1/2 cup water to make it 1 cup as the canned milk is very thick.
Hi Kannamma. I do not have access to fresh coconuts. I can get canned coconut milk and canned coconut cream. Can I substitute one of these for the coconut milk in this recipe?
Thanks!
sure. you can.
I tried this recipe. Biryani was very tasty, flavorful. I followed the recipe down to the last line. My only problem was the rice became over cooked and mushy. I prefer biryani to be fluffy and the rice separated from one another(udiri). Next time when I make this biryani, I am going to cook it in the rice cooker instead of pressure cooker. I always make biryanis and tomato rice in rice cooker usually. I really liked the recipe once I read it, that’s why I tried it out. Thanks for posting it. I will take some pictures and post it next time.
Sure. Let me know how it turns out,
Nice recipe Kannamma, the biriyani was so flavourful n delicious!!
Thank you so much Loveena. What a beautiful name.
Thank you so much! ?
Great recipe! I do have a question, what steps do you recommend if we do not use a pressure cooker for this recipe?
If cooking directly on the pan, then cover the pan with a lid and let it cook for the first four minutes on medium flame. Open the lid. Gently mix once from the bottom, cover the lid again and simmer for 10 minutes on very low flame. Remove the pan from heat and set aside.
If cooking in a pan, Do not disturb for the next 20 minutes. The rice will get swollen and absorb all the left out moisture. This time is very important. Do not rush.
Hi
Could you pl. tell me the brand/ model of the small wet masala blender? Do you need to add little water while grinding?
Is it 110v?
Would like to see if its available here in the Bay Area or on Amazon.
Thanks
Hi, its the panasonic mixer. It is not 110v. Adding water depends on the quantity. If too less a quantity, then I add a few tablespoons of water.
Hi mam
Last week I prepared this briyani. The result was good, taste was awesome… Thank you for posting easy and tasty recipe. My hubby liked it much….. Superb taste….. Thank you mam. Here Internet slow so couldn’t rate it…. I ll give all stars…. 🙂
Thats so nice Ramya. Really glad to know.
Mam today I prepared this biriyani.its really awesome.sema sema sema !!!thank u:)
Thank you so much Subbu! Semaya kalakeeteenga pola!
good recipe 🙂 which coconut milk to add ?? First pressed or second pressed or third pressed? taste will vary for varying concentrations right ?
First and second pressed Priya. Thanks for pointing it out. Have updated in the recipe.
Very simple but a tasty one 🙂
Thank you!
Nice. Very good website. Photos are eye appealing. As per my Tamilian taste. Given.
Made this chicken biriyani for yesterdays lunch. Tasted so good. First time, cooked chicken biriyani with coconut milk. We just loved it. Thank you so much..
Yes Sunita. Its a very simple but flavorful biryani.
Oh my god , tastes divine Thanks a lot for sharing this recipe … I have never tasted like this ☺️
Thank you Subha.
1. Its compulsory to soak the rice in water for 30 mins????
2. And shall we add curd in this recipe ???? If yes means in which stage need to add?? , pls mention the stage.
Atleast 20 min, please soak the rice. My mom never uses curd for this recipe as we add coconut milk.
No yoghurt in this too yes? 🙂 Will review again when I have tasted it 🙂
No Curd in this recipe. 🙂
very simple and easiest method thank u sis
Thank You!
Hello Suguna, as I glanced through the last picture in the step-by-step instructions (with the cooker lid open), I could literally smell the chicken biriyani 🙂 Thanks yet again for a wonderful recipe with wonderful pictures.
Thank you so much Ravi!
Hi
How long should the rice be soaked?
About 30 minutes. It will be of correct time when you start soaking the rice and you start to cook.
Shall we add normal milk instead of coconut milk?
I prefer coconut milk as it has a unique flavor and its rich.