
Bakery style Home made curry bun recipe from scratch with a creamy paneer filling. With step by step pictures. Stuffed Bun.
This recipe came into being during a contest conducted for Julia Child’s 100th birthday. And you all know who won. I did these buns for the contest and topped with Julia Child’s name printed in dough. After we moved back to India, I ran a baking and catering business for a couple of years and this recipe was the most ordered item for parties. I must have done countless batches of curry buns in my life. My husband and son love these stuffed buns. They used to sneak one or two from the catering order as I always baked more. Vinodh said that he misses these and I realized that its been quite a while since I baked these super delicious stuffed buns. So today my secret recipe is out for my dear readers of KC. Enjoy!
There are a few things that make a good stuffed bun. The bun needs to be super soft. The key to a good soft bun is a moist dough. Its no rocket science. If your dough is soft, your bread will be soft. If your dough is dry, your resultant bread will also be super dry. So the recipe will work well if you stick to the proportions mentioned. Yes its that simple. Just follow the recipe.

For the filling
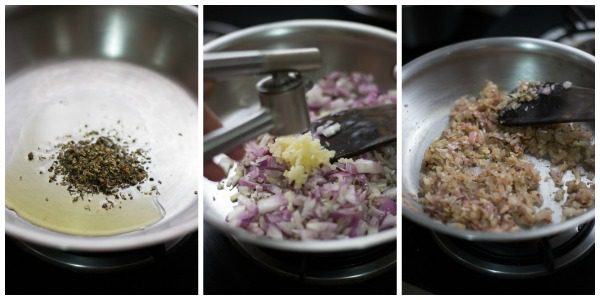
Heat a tablespoon of olive oil in a pan and add in Italian herb seasoning, finely chopped onion and crushed garlic. Fry till the onions are soft.
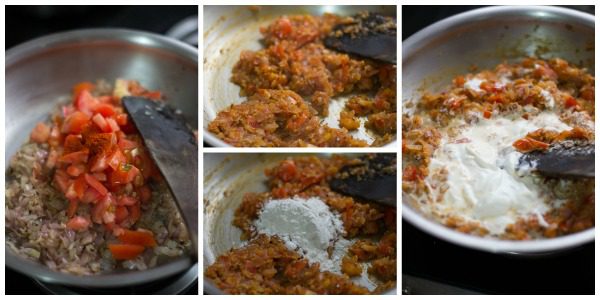
Add in a finely chopped tomato, salt and red chilli powder. Fry till the tomatoes are cooked and dry. Once the tomatoes are dry, add in the flour and sauté for a minute. Then add in the cream and cook for a minute more until all the cream is absorbed into the mixture.
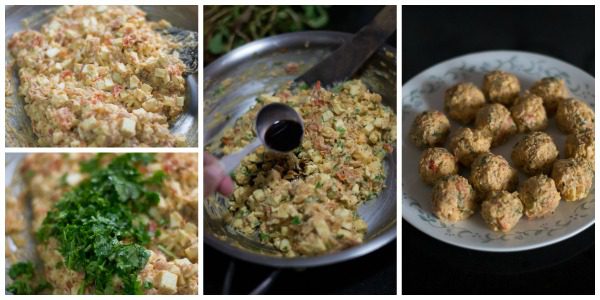
Add in the small cubed paneer and mix well to combine. Switch off the flame and add in the coriander leaves and the vinegar. Mix well to combine. Make 16 balls out of the mixture. Set aside.
For the BUN!
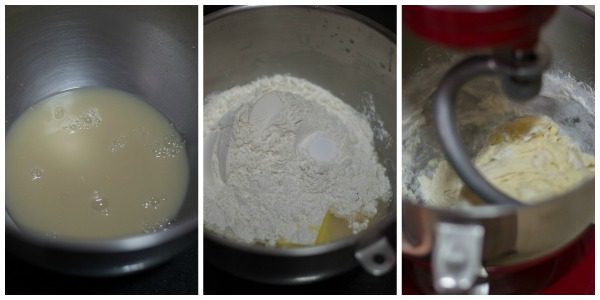
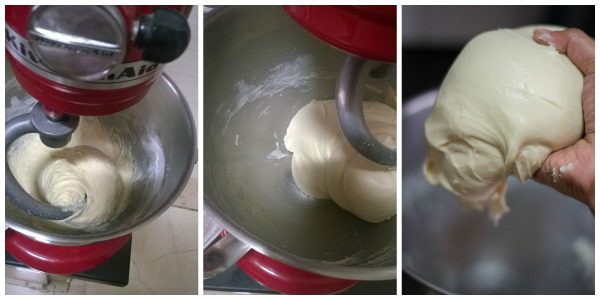
Take a big bowl and add in the luke warm water. Hot water will kill the yeast. So let the water be just warm to the touch. Add in the sugar and the yeast and set aside for 5 minutes. Then, add in all the rest of the ingredients and start kneading. I kneaded in my kitchen aid in medium speed for a good 7 minutes. If kneading by hand, knead for a good 12-13 minutes. The trick in kneading is to avoid the temptation of adding flour. Too much flour alters the moisture content and will result in a dry bun. If kneading by hand, don’t add all the flour at once while starting to knead. Save a cup of flour and use it while kneading. Its going to be a very sticky dough.
The dough should be soft, stretchy and a little sticky at the end of kneading. Its a very moist dough. Don’t worry if the dough is tacky.
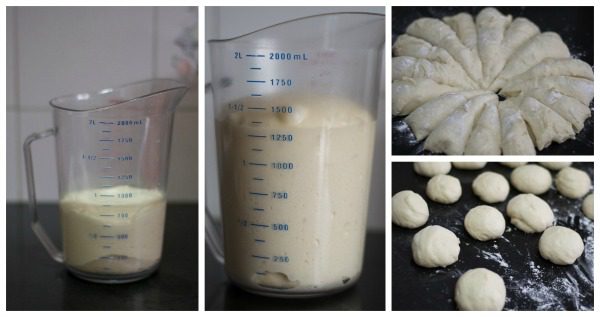
Place the dough in a lightly greased bowl and let it rise until doubled in a warm draft free place. It should take about 2 hours. It might take more or less time depending on where you live. Once the dough has almost doubled, gently deflate the dough on a floured kitchen counter and divide the dough into 16 pieces. Dust flour on the work surface. Shape each piece of dough into a smooth ball. Set aside and let it rest for 5 minutes to relax the gluten.
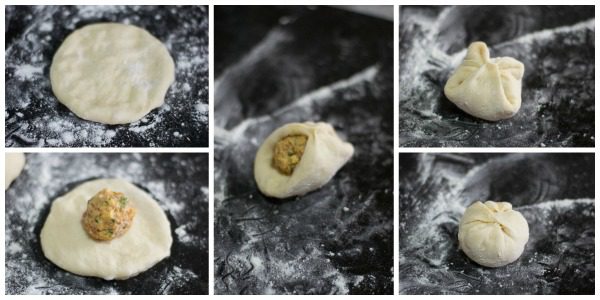
Dust the work surface with flour. Flatten each dough ball and keep the filling in the center. Press and seal the edges by crimping with your finger tips.
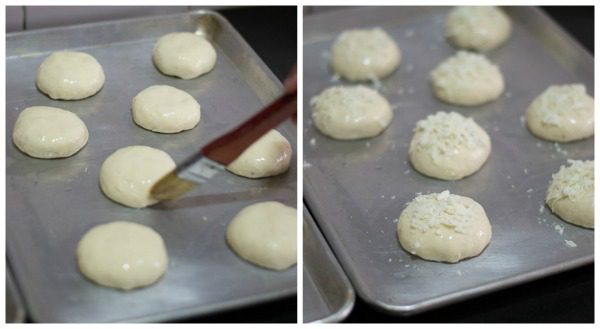
Gently flatten the bun and place the bun seam side down on a parchment lined sheet pan. Cover the buns and let them rise for about half an hour. Towards the end of the rising time, preheat the oven to 400°F/200°C
Brush all the risen buns with egg white / egg wash. Sprinkle a tablespoon of shredded cheese on top of each bun.
Bake the buns for 20 minutes until golden. Rotate the sheet pan in the oven after 10 minutes for even baking.
Remove the buns from the oven and cool on a wire rack.
Note: After baking for the specified time, if the buns are not browned well, set the oven in broil mode and bake the buns for 30-60 seconds until the top of the bun is golden. Many readers have written to me that they broil it at the end to get the desired brown colour in Indian OTG.


Paneer Stuffed Curry Bun
Bakery style Home made curry bun recipe from scratch with a creamy paneer filling. With step by step pictures. Stuffed Bun.
- Total Time: 4 hours 20 mins
- Yield: 16 buns 1x
Ingredients
For the Filling
- 1 tablespoon Olive Oil
- 1 teaspoon Italian Herb Seasoning
- 1 Onion
- 4 Cloves Garlic
- 1 Tomato
- 1 teaspoon Salt
- 2 teaspoon Red Chilli Powder
- 2 tablespoon All Purpose Flour (Maida)
- 1/2 cup Cream (I used Amul Cream)
- 200 grams Paneer
- 4 sprigs Coriander leaves
- 1 teaspoon Vinegar
For the Bun
- 1 1/4 cup Lukewarm Water
- 2 tablespoon Sugar
- 1 tablespoon Active Dry Yeast
- 2 tablespoons Butter
- 1 Egg plus 1 Egg Yolk
- 3 1/2 Cups All-Purpose Flour (Maida)
- 1 teaspoon Salt
For the Bun Topping
- 1 Egg White beaten well for Egg Wash
- 1 cup Shredded Mozzarella Cheese
Instructions
For the Filling
- Heat a tablespoon of olive oil in a pan and add in Italian herb seasoning, finely chopped onion and crushed garlic. Fry till the onions are soft.
- Add in a finely chopped tomato, salt and red chilli powder. Fry till the tomatoes are cooked and dry. Once the tomatoes are dry, add in the flour and sauté for a minute. Then add in the cream and cook for a minute more until all the cream is absorbed into the mixture.
- Add in the small cubed paneer and mix well to combine. Switch off the flame and add in the coriander leaves and vinegar. Mix well to combine. Make 16 balls out of the mixture. Set aside.
For the Bun
- Take a big bowl and add in the luke warm water. Add in the sugar and the yeast and set aside for 5 minutes. Then, add in all the rest of the ingredients and start kneading. I kneaded in my kitchen aid in medium speed for a good 7 minutes. If kneading by hand, knead for a good 12-13 minutes.
- Place the dough in a lightly greased bowl and let it rise until doubled in a warm draft free place. It should take about 2 hours. It might take more or less time depending on where you live. Once the dough has almost doubled, gently deflate the dough on the kitchen counter and divide the dough into 16 pieces. Dust flour on the work surface. Shape each piece of dough into a smooth ball. Set aside and let it rest for 5 minutes to relax the gluten.
- Dust the work surface with flour. Flatten each dough ball and keep the filling in the center. Press and seal the edges by crimping with your finger tips.
- Gently flatten the bun and place the bun seam side down on a parchment lined sheet pan. Cover the buns and let them rise for about half an hour. Towards the end of the rising time, preheat the oven to 400°F/200°C.
For the Bun Topping
- Brush all the risen buns with egg white / egg wash. Sprinkle a tablespoon of shredded cheese on top of each bun.
- Bake the buns for 20 minutes until golden. Rotate the sheet pan in the oven after 10 minutes for even baking.
- Remove the buns from the oven and cool on a wire rack.
- Prep Time: 4 hours
- Cook Time: 20 mins
- Category: Bread
- Cuisine: Indian

What could be a replacement for yeast? In lockdown I don’t get it anymore.
I want to try this recipe. Can you please share ingredients for 8 buns. The above recipe makes 16 buns. Thank you.
Hi Suguna,
Can I substitute Maida with bread flour? If yes, do I have to make any changes to the recipe in terms liquid:flour ratio?
Thanks
Diana
When buns were served and I announced that they are ‘Home made’ as I see being enjoyed , if the immediate exclamation is ‘Oh.. really!! I thought it’s from the bakery’ – would definitely be a certification of goodness.thanks Suguna, uses the ingredients just as you mentioned and had a lovely evening yesterday with these soft and tasty paneer filled buns
Thank you Nayana!
Suguna,
Thanks for the great recipe. I am planning to make these over the weekend, can i omit the mozzarella cheese on top ?
Regards
Madhu
Sure you can omit the cheese!
Thanks for the recipe , Suguna ! The buns turned out really soft and tasty !
Thank you. Glad you liked it!
Hey,
I tried out the recepie but the bun turned out to be a bit dry. Can u tell me what is the possible mistake I had done
Using more flour while kneading is a common mistake that results in dry bun. Soft dough = soft bun.
Hello!!
Can we use atta instead of the maida?
Thank you!
Not for this recipe. If you are using wheat, the liquid proportion also needs to be changed.
Simply awesome. Another keeper from this website. loved it. My fussy 4 year old relished the bun bites 🙂
Yes,it’s true i didn’t knead properly for I was too scared of overdoing it and I used my hands to knead. In between I want you to know that I inspire a lot from you and i feel totally strange calling you mam so will it b ok if I address you as suguna akka?
Thats so nice of you Steffi. Sure. Kneading is the main technique when it comes to bread.
Hi mam,
I tried your buns today and they looked so lovely but it turned out to be very hard.I made them in an otg.I always bake in a cooker,otg is something new to me…what could have gone wrong? ?
The bun coming hard is because of less kneading and adding lot of flour while kneading. How did you knead your dough?
Hi Suguna,
I tried this recipe and it turned out yum!
Distributed to friends and everyone loved it. As you know its not available here:(
Could you please share how to make paneer at home?
Loved it!
Sangy
Thank you Sangy!
Hi I would like to try this recipe but have a doubt .for a eggless version u have said we should use 1/4 cup water for 1 egg . The recipe calls for 1 egg and egg yolk . Is the 1/4 cup sufficient for this or should I add more?.will the recipe suit to make sweet thengai bun?. Pls reply. Thanks.
Yes the 1/4 cup additional water would suffice. Thengai bun – I have never tried but will definitely work as this is an all purpose dough that I have used to make many many things. Let us know how it turned out.!
Hi Suguna,
Really happy to have found your site. This looks delicious. Just wondering if I can make these ahead and just microwave them before serving? Thanks!
Sure.
Hi Suguna,
How would ground chicken taste for the filling? Have you tried any time?
Thanks!
Yes Sharon, I have tried it with chicken and it tastes good!
Thanks for the awesome recipe. Can i make the dough, stuffing n store it so that i can bake them whenever required?
you can make the stuffing ahead but the dough you need to make when required as it has yeast.
How many quarts is your stand mixer?
Just wondering, what size would be enough for a small family?
Hi Elizabeth, I have a 5 quart kitchenaid that I have had for 5+ years now. I am really happy with that and I do a lot of mixing and baking and so I went for this bigger one. The size will really depend on the quantity you plan to bake and since you say that its a small family, go for the small size available and I strongly recommend kitchenaid.
hi suguna,
i am also from bangalore.and when going through your recipes ,you had mentioned wusthof knives.can you tell me where i can get in bangalore and also how do you sharpen it if it gets blunt?i also wanted to know the size of your le creuset which you had used for biryani.thanks for this wonderful blog and please add more fish recipes!
Hi Prithi, I bought the knives from USA and I have a sharpening steel that I use daily and a whetstone that I use once in 2 months. The dutch oven is 5 1/2 quart. Hope this helps.
Great to read the stories behind every recipe you share. Can’t wait to try this?
So, who won the contest? ☺️
Of course moi!
Hiii
I wanna know..can we make them eggless…:)
Yes you can. Substitute 1/4 cup of water for each egg and instead off egg wash, brush them with clarified butter.