
Easy Ulundu Murukku, Urad Dal Murukku Recipe, Deepavali Murukku Recipe. Easy beginners recipe.
Click here for ulundu murukku made in air fryer.
I learnt this easy Ulundu Murukku Recipe from Perur Athama. Long time back, I was talking to her from US during Deepavali time and I was really homesick. There was no sign of Deepavali around for me. Winters can get cold and lonely in America. I dint have much tools with me and I was not ready for murukku adventure with an infant around. She convinced me that I could pull off this recipe and I did. Ever since, I have been making it all the time. It is one of the easiest recipes ever. This recipe makes for such tasty murukkus. Never tell anyone how easy this is to make. This recipe is perfect for a beginner and the ingredients are super easy. The surprising thing about this murukku is that the urad dal is boiled and added. I have never seen such a recipe. But trust me, its one of my best kept murukku secrets.
Here is how to do it:
Wash and soak half cup of urad dal in 1.5 cups of water for 20 minutes. Then pressure cook the dal with the water for 6 whistles. Switch off the flame and let the pressure in the cooker release naturally. Open the cooker and mash the dal with the back of the spoon. It should mash easily. If the dal is not fully cooked, add 1/4 cup more water and cook for 2 more whistles again. The dal should be fully cooked to a fine paste. Mash the dal with a back of a spoon. Set aside.

For every 1 portion of dal used, we will use 5 portions of rice flour. We have used half a cup of urad dal. So measure 2.5 cups of rice flour and place it in a bowl. Add salt, Ajwain seeds (Omam seeds), Sesame seeds (ellu) and a table spoon of butter. Don’t add too much butter or the murukku will become very soft while frying. Add in the cooked urad dal. Mix everything well and add water little by little to form a smooth ball. The dough should be smooth and there should not be any cracks in the dough. Add little water at a time. I added one cup of water. But each and every time, the water quantity might change depending upon the age of the rice flour. So the 1 cup water is only an approximate amount. You need to be your own judge. We are aiming for a smooth pliable dough without any cracks. Once the dough has reached that level, knead briefly for 30 seconds. Set aside. Note we did not add any kaaram (spice or chilli) to this recipe. This recipe has no kaaram.

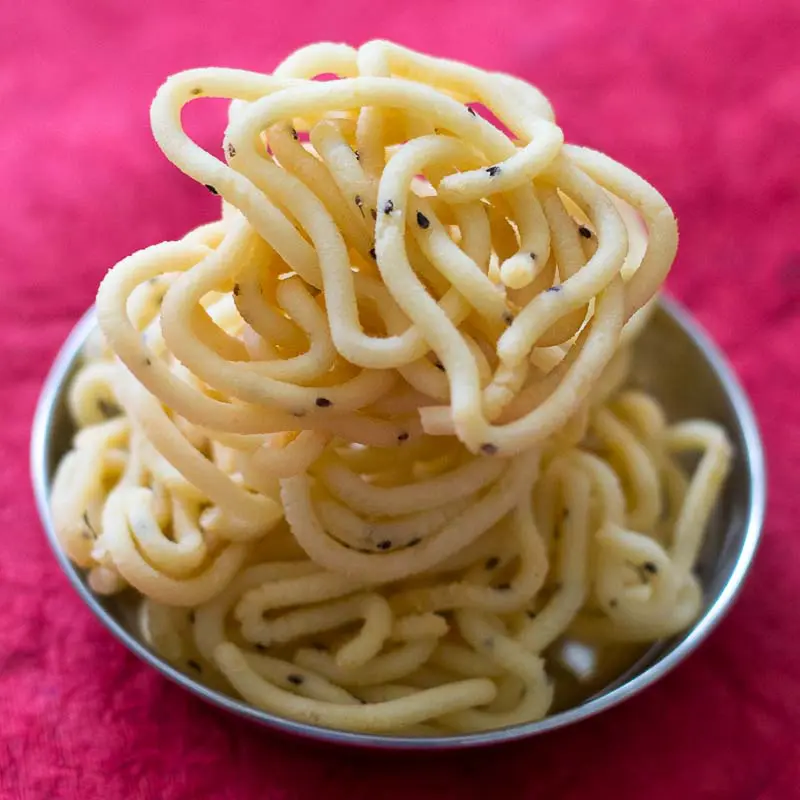
Form small logs and fill in the murukku press. I used the three hole mould for this murukku.

Heat oil until hot. Press the murukku dough from murukku press on a ladle and use the ladle to gently drop the murukku in hot oil. Remove the murukkus from oil once the bubbles in the oil settles down. Store the murukkus in an air tight container for up-to 2 weeks.

Awesome murukkus are ready in no time.

Easy Ulundu Murukku, Urad Dal Murukku Recipe, Deepavali Murukku Recipe
Easy Ulundu Murukku, Urad Dal Murukku Recipe. A very easy to do recipe. Popular Deepavali snack recipe.
- Total Time: 1 hour
- Yield: 30 murukkus 1x
Ingredients
- Measurements Used – 1 Cup = 250 ml
- 1/2 cup Urad dal
- 2.5 cups rice flour (store bought)
- 1/4 teaspoon Ajwain seeds (Omam Seeds)
- 1/2 teaspoon Black Sesame Seeds ( Ellu )
- 1 teaspoon salt
- 1 tablespoon butter
- 2 to 3 cups of water
- 750 ml Vegetable Oil / Refined Peanut Oil for deep frying
Instructions
- Wash and soak half cup of urad dal in 1.5 cups of water for 20 minutes. Then pressure cook the dal with the water for 6 whistles. Switch off the flame and let the pressure in the cooker release naturally. Open the cooker and mash the dal with the back of the spoon. Set aside.
- Add rice flour, salt, Ajwain seeds (Omam seeds), Sesame seeds (ellu) and butter.
- Mix everything well and add water little by little to form a smooth ball. The dough should be smooth and there should not be any cracks in the dough.
- Form small logs and fill in the murukku press.
- Heat oil until hot. Press the murukku dough from murukku press on a ladle and use the ladle to gently drop the murukku in hot oil. Remove the murukkus from oil once the bubbles in the oil settles down. Store murukkus in an air tight container for up-to 2 weeks.
- Prep Time: 20 mins
- Cook Time: 40 mins
- Category: Snacks
- Cuisine: Tamilnadu, South Indian

Hi
I tried many of your recipes and it always turns good. I just have a doubt before making this. Do I need to use roasted rice flour?
Mary
No need to roast.
I made it, it turned out really well. I just couldn’t stand the ones that we get here in North America. Thanks for sharing your recipe.
Thank you so much. Glad you liked the recipe.
Hi suguna,
I followed the above recipe. Came out very well for the first time.
But at the second time Murukku became dark brown colour. Still the taste is same and good. But not happy with the colour. Any idea what could be the reason? Kindly reply dear.
Thanks in adv
Did you do anything differently the second time?
Just tried and came out exactly as said. Thanks.
Thank you!
I tried this murukku as per your measurements but it absorbed more oil.shd I increase the rice flour measure ment. Priya
If you must have added more butter, it might absorb a lot of oil.
Also if the dough is very wet, this can happen too!
Made this today. It was very yummy and easy. While adding water we checked to see if the dough would go through the murruku press .Thank you for the recipe.
Thank you!
Can we use store bought urid flour instead of dual? And do we need to dry roast any flour( rice or urid) before we add water to make dough?
No. Store bought flour wont work in this recipe.
Can we make payaru murukku the same way?
Not sure.
Yummy.mindblowing. easy to make and my entire family cherish
Thanks so much for trying the recipe. So glad you guys liked it. Stay safe and happy cooking.
I tried this recipe but the murukku was crumbled and it had too much oil. what could be wrong?
Adding too much butter / oil to the dough will be the reason for murukku becoming too soft while fried.
Tried out. It comes very nice.yummy.thanks for the recipe.
I’m also makes murrku in maharashtra and its my begnig so could you support me gor develop my buissness my murrku is catch so much oil i request you to told me how can i remove oil from murrku for stor long time
This murukku recipe is very good and I make this for my grandson .
Thanks a lot Suguna. I have been following your veg receipes for quite sometime. This one is super duper no mistake receipe. I always tend to make mistakes while making snacks for Diwali or otherwise, so stopped making thattais or murukkus. Something told me to try this one and it was a big hit at home. Thanks a lot for the ulundhu trick.
Thank you!
Hi Akka,
I have tried this recipe twice now. Both times it has been awesome. First time my mom was skeptic about the results when i told her about my new found joy. This time i made it with her and she is now ecstatic to have learned anew recipe which is so easy and tasty. We couldn’t stop talking about it all evening. The second time, due to lack of time i had refrigerated the cooked dal due to lack of time . The next day i broughtthe dal to room temperature and proceeded to make the dough and muruku. It didn’t fail me even then.
Thank you for such easy and wonderful recipes and helping us bring some absolute good food to table.
Thank you so much!
Hi Suguna,
I’m trying it now. Just have a query, can I keep the dough in the fridge and make it next day due to the lack of time?
Thank in advance! 🙂
Neeraja.
Hi Neeraj, Have never tried but I think you should be ok. Please bring the dough to room temp before you proceed.
Hi Suguna, i have tried so many recipe from ur site and all of them where a huge hit. Sorry was not able to write to you before this. All of them came out so well, especially this ulundu muruku. I never thought i ll be able to pull it off, but it came out so well. I only remember those days when mom used to prepare for muruku for days… It was a tedious process. This one is so simple and easy, and u make it even more easier with the way u pen down stuff. Thank you so much for giving us such yummy recipes and beautiful stories behind them. Love your recipes. Thank you.
Thank you so much!
I tried this for Diwali and it was a huge hit!
This is the first time that I am ever commenting in a blog, because I have tried so many recipes from here and the outcome has always been exceptional. Keep up the great work!
P.S I love the write ups too!
Thank you so much!
You are the best. Love love love all of your recipes.
Tried this murukku and its super yummy. Reminds me of mom 🙂
Happy Deepavali to you and your family! Thank you!
Thanks a lot for ur recipe…i prepared it today for Diwali… came out very well…thanks a lot…
Happy Deepavali to you and your family! Thank you!
Fool proof recipe!!! Thanks for sharing this. Tried it today and it came out really well. Such an easy and delicious recipe
can we substitute urad dal with urad flour?( store bought)
If yes, proportions pls?
Thanks u
Tried this today. Came out very well. Better than what we buy outside. Thanks for the recipe.
Hi Suguna,
Really like how you described each step and with photographs too.Thank you. Before trying, I want to know what kind of oil you use here in the US for deep frying . You mentioned refined peanut oil; where do you get that in the US?
You can use Canola oil or vegetable oil and it works fine.
I tried this recipe today. It came out perfect. Thanks for the easy method.
Thank you Selvi!
Hi tried and came out well
Thank u so much
🙂
Omg!! Such a easy recipe and yummy muruku… Couldn’t thank you enough.
Something wrong with the site not allowing me to rate 5 stars
Thank you!
Simple recipe….regular ingredients….No preparations needed…..and awesome outcome…what more do I have to say……tried it out last evening…. everyone just loved it.
Thanks for the lovely recipe Suguna
Thank you Mirthula
Hi mam,
instead of rice flour,can i grind rice. if so,wht will be the measurements?
i tried it and my kid loved it. Thank you:)
Thanks Priya.
Usually store bought rice flours are fried ones. Can I use fried rice flour which is used for making idiyappam? Pl reply.
Idiyappam flour is fried but not the regular rice flour that you get at shops. You can use the regular kind.
Hi, nice post,,,, kindly clarify regarding rice flour. which type of rice flour have you mentioned in this post. Kindly tell me how to prepare the rice flour that you have mentioned in this post… 🙂
I have used plain store bought rice flour for this recipe.
Thanks for this recipe. I am from Malaysia and am eager to try this out. Just wondering, should I use idiyappam flour or plain rice flour? I am using the store-bought version. Btw, love all your postings! 🙂
plain rice flour it is!
Can v use store bought rice flour??
yes.
Simple and super recipe, thanx
Gud bless u.
I tried this.. it came out awesome!! my friends loved it..
Thank you so much. Really glad that the recipe worked for you!
Tried this .came out wonderful
Did you use peanut oil for frying? Why and can I use vegetable oil for frying?
You can use vegetable oil for frying. Refined peanut oil is also used traditionally. But vegetable oil gives lighter murukkus.
I tried ur murukku receipe today!!! My friend told me that this is the best murukku she ever tasted in her life..so couldn’t resist myself to comment on ur website. By the way I’m the biggest fan of your recipes.u are awesome u know. . Thank you. .
Yippiee…..Thank you so much Shebha. Really glad your friend gave a big thumbs up. Thanks for writing in! Your words mean a lot to me. 🙂
Dear Suguna,
I made the kongunad chicken kolambu. It tasted awesome after simmering after 40 mins. That too without the addition of the coconut. But the chicken got overcooked and hard. Can I circumvent this because the kolambu was awesome. And also where can I get a whetstone for knife sharpening in bangalore? What brand do you use?
Sure Prithi. Go ahead. You can get the whetstone in Food Hall, MG Road or at Adams and Company near Russel Market.
Dear sis, vanakkam. And this s it. I had been visiting KC often in the past two days looking for karam recipe deary.would prepare very soon.
Made burfi and it turned out super tasty. I kept the burfis in a transy jar placed on dining table so my boy could see. As he came from school he just kept eating one two three and more. This s the ultimate happiness of me as a cook. I never know I could prepare sweets at home. You made it possible. As we eat sweets we never think of the labor of love ,as you say, behind it. Only when we prepare we know its no cake walk. Gooey stage to wet sand stage s really the difficult part of the recipe. My burfis were a little dry on the surface but soft when eaten.what may be the reason ?
Hi Andal, These burfis are irresistible. Woohoo – I am so happy that your lil boy had these and liked it. It gives me immense happiness when I hear that children like my food. Thank you so much for writing in. The surface of the burfis are supposed to dry a little as the sugar crystallize when it cools. You did it right Andal. Give me a virtual hi-5! Here you go!